Showing posts with label Bakery. Show all posts

Monday, January 4, 2010

Tunisian Brik

I wanted to add some more appetizers to my repertoire, so when I found a recipe for Tunisian Brik in my appetizer cookbook ("Appetizers, Finger Food, Buffet & Parties", by Bridget Jones) I had to try making it. I did make a few small changes - of course. The following is what I came up with.
  • 3 TBS butter, melted
  • 1 small red onion, finely chopped
  • 1 lb ground turkey
  • 1 garlic clove, minced
  • 1 TBS lemon juice
  • 2 TBS finely chopped cilantro
  • 1-2 eggs, scrambled
  • phyllo dough
Start by mixing everything but the egg and phyllo dough in a frying pan and cook until meat is thoroughly cooked. Then it is on to phyllo dough!

Let me start by saying that phyllo dough is a mother to work with! It is very thin, tears easily, dries out quickly, and then crumbles. I kept a mister handy to keep the dough moist; but be careful! If you get the dough too moist, it sticks to everything!


I laid out two sheets. the recipe called for brushing with melted butter, but due to the delicacy of these sheets, I sprayed them with Pam instead.
The sheets were rather large, so I cut them into sixths.
Then I folded each of the pieces until they made 3"x3" squares.

They don't need to be perfectly even. As you can see, some parts have more layers than others.
Place a tablespoon of the meat filling in the center of each square and a teaspoon of egg over that.

Fold the phyllo corner to corner and seal with a little water. Place the triangles on a greased/oiled baking sheet and drizzle with olive oil.
Bake at 425F for 8-10 minutes. They should be golden brown.


These were AWESOME! And once you get the hang of handling the phyllo dough, they are amazingly easy to make!

Thursday, January 1, 2009

Apple Brie Flatbread

Earlier this year I had the good fortune to attend a drug rep dinner being hosted at a local up-scale restaurant that I had never been to. The food was amazing! But the item that I came away thinking, "I have got to figure out how to make THAT" was the Apple Brie Flatbread. It was a crispy, almost cracker flatbread topped with apples, brie, nuts, carmelized onion/shallot, and balsamic vinegar reduction. YUMMY!!!

It was actually a lot easier than I thought it would be. The hardest part was figuring out a bread recipe. I have a fantastic bread machine book that I got from Borders (a very dangerous place for me!). If you love bread, get this book! The recipes will work great as hand-mades too. I often just make the dough with the machine and bake the bread in my oven. That is the case with the flatbread I made for these appetizers.

There are a lot of flat breads in the book, but I chose Carta di Musica as it seemed the closest to that nearly-cracker flatbread.
  • 1-1/4 cups water
  • 4 cups flour
  • 1-1/2 tsp salt
  • 1 tsp sugar (I actually used 1 TBS C&H dark brown sugar, cuz that's what I like!)
  • 1 tsp yeast
Put it in the bread machine in this order and run it through the dough cycle. Take the dough out and cover with a piece of plastic wrap while you work. Break off a small piece, about the size of a walnut. Roll out the piece to as thin as you can get it. It helps to keep the dough from sticking if you ocassionally oil the rolling pin. As you finish rolling each piece, place it in a stack under a piece of plastic wrap to keep them from drying out.

Once you have enough rolled to fill a cookie sheet, place them on the pre-heated sheet and bake them in the oven at 450F for 10-15 minutes. For this recipe, you will want to take them out while they are still light as they will go back into the oven for a second baking.

The topping is fairly self explanatory: apples, brie, nuts, carmelized onion/shallot, and balsamic vinegar reduction.
  • The apples can be any kind. I like to use sweet, crisp apples like my current fav -- Honeygold.
  • I love Joan of Arc brie, unfortunately my grocer has been having trouble getting it so I picked up some Delice de France. I liked this very much as well. It is different in that it is stronger, but it is delicious!
  • The nuts could be walnuts, pecans, hazelnut, almost any nut -- I LOVE pecans, so that's what I used.
  • My son does not like onions, so I skipped the carmelized onion/shallot part. It is very good though, so you might want to try it yourself. I recommend using either shallots or very sweet, mild onions like Vidalia. Slice them thinly and cook over medium low heat until carmelized.
  • I used about 6oz of balsamic vinegar. It needs to be reduced to something resembling molasses by heating it over low heat for about half hour. DO NOT LET IT BURN!
Thinly slice or dice the apples and brie and place desired amounts of each on the flatbread pieces. Sprinkle with chopped nuts. Drizzle the balsamic vinegar reduction over the topped flatbreads (if you accidentally reduced it too much to drizzle, just add a little water or more balsamic vinegar). Place in the oven until the brie is melted.

OMG!! THESE ARE DELICIUOS!! They were so great, I didn't even get a chance to take a picture before half of them were devoured by onlookers at our New Year Eve party! These are best fresh from the oven, but can be re-heated in the microwave or eaten cold as well.

Saturday, March 24, 2007

Digestive Quest

[Warning: this post is LONG! If you just want the final recipe go here]

While I was over in Scotland I became quite fond of the McVitie's Plain Chocolate Digestive Biscuits. I always had them with me on my travels. They made a great snack to get rid of hunger as well as keep me energized. They are extremely popular in Great Britain and Ireland. McVitie's is actually an Irish company. And coincidentally enough, on St. Patty's Day I found them in a store here.

World Market. One of the best stores ever. Love It! Love It! Love It!

We went there after catching a movie with some friends of SSB and myself. As I was walking up to my friend in the store, she showed me the package of McVitie's with chocolate and started to tell me I HAD TO GET THEM when I reached into my own basket and pulled out my own package! We both had a good laugh. SSB said it looked just like a commercial.

But they were fairly expensive too. $3.99 for a package of 18 biscuits. (I should point out at this time for those of you not in the know that biscuits in Great Britain/Ireland are actually cookies - not our biscuits). So I decided that I might just have to figure out how to make these myself. I mean, there's got to be a recipe for them SOMEWHERE on the internet, right?

Well, I found quite a few recipes for digestive biscuits, but I also found a lot of comments about how they weren't the same as McVitie's because those particular biscuits just couldn't be replicated at home. I was not discouraged. I figured that if I collected enough of the recipes, saw what they had in common and compared them to the ingredients on the package of the McVitie's that I had purchased, I might just be able to crack the code. I did some research on McVitie's digestives to find out how they were created, how they got their name, what makes them special, etc; to try and get some clues.

One clue that helped me in tweaking the recipes that I found was that they are called digestives due to the large amount of sodium bicarbonate in them that helps settle the stomach (and here I thought it was because of all the bran!). Most of the recipes that I found did not seem to have much baking soda in them at all.

I started with a recipe that I Frankensteined from several of the recipes that I had retrieved. I baked one biscuit at a time, recording the results and changes I made to the dough as I went along. The following is the unedited process of creating the biscuit I wanted:

Sy's first batch

INGREDIENTS:
3/4 cup whole wheat flour
1/4 cup all-purpose flour
1/2 teaspoon baking powder
1 tablespoon rolled oats
3 tablespoons butter
4 tablespoons brown sugar
1 tablespoons Crisco
1/4 teaspoon vanilla

DIRECTIONS:
Preheat oven to 375 degrees F (190 degrees C). Grease cookie sheets.
In a large bowl, mix together the flour, baking powder, and oats with a pastry blender. Mix in sugar with a pastry blender. Throroughly mix in vanilla, then add fats. Mix these in with a pastry blender until the mix is uniform.
Knead dough on a floured surface until smooth. Roll out dough to
approximately 1/8" thickness. Cut into rounds with cookie cutter about
2 1/2 inches in diameter. Transfer to cookie sheets and prick with a
fork. Bake 15 to 18 minutes, or until golden. Let cool on wire rack.
Store in an airtight tin.

THINGS I WOULD CHANGE:
I would cut back on the sugar by about half.
I did add two singles of half-n-half after trying one biscuit. This made the biscuit a little less grainy. I think I would try adding more to see if I could get them fluffier this way too. I found a soda cracker recipe that calls for quite a bit of liquid. Maybe replace 1 TBS of the butter for liquids.
The McVitie's biscuits use palm oil - I would try that. It seems that there is a slightly bitter taste to the McVitie's that you can't get with this recipe and I think that it is the palm oil.
I tried chilling some of the dough before rolling and cutting. This really didn't seem to make too much of a difference in the final product, but it did make the dough easier to handle.
This recipe uses oats, but McVitie's does not contain any so I would substitute some wheat product for the oats.
They also need to be fluffier, so I might try adding a bit more baking powder - this would also add a little of that bitterness that I am looking for.
I also reduced the heat to 350F which got rid of the uneven browning that I got in the first batch.
I also did all the biscuits, after the first one, on the baking stone instead of a cookie sheet. I think this was a good move.

INGREDIENTS IN MCVITIE'S:
wheat flour, plain chocolate (29%), sugar, cocoa mass, palm oil, butter oil, cocoa butter, emulsifiers (soya lechithin, polyglycerol, polyricinoleic acid), natural flavor (vanilla), palm oil, wholemeal, sugar, glucose fructose syrup, raising agents (sodium bicarbonate, tartaric acid, malic acid), salt.


plain chocolate = bakers chocolate
sugar = dark brown sugar
cocoa mass = the precursor to cocoa powder
emulsifiers = things like egg yolks and lecithin - they hold the crumb together and give the biscuit greater shelf life
wholemeal = whole wheat flour
glucose fructose sugar = corn syrup
raising agents = baking soda, precursor to cream of tartar (it's a byproduct of wine), found in apples (makes things sour)


Sy's 2nd batch:
I halved the sugar and subtracted 1 TBS butter.
I added 1 TBS milk powder and 1/3 cup water
Along with the 1/2 tsp baking powder I added a 1/2 tsp baking soda as these biscuits are said to be known for their high content of baking soda - hence the name "digestive".
I substituted wheat bran for the oats as the original biscuits have no oat in them.

My first biscuit came out too chewy and blonde.
I added another TBS of both butter and sugar.
I also added a bit more wholemeal flour and baked another cookie.

The biscuit was still too sconey, so I added another TBS each of butter and sugar. I also raised the temp of the oven to 360-370F.

This batch was kind of turning into a train wreck, so I set it aside and started a new batch.


Sy's third batch:
I went back to the original recipe.
I realized after I mixed this third batch that I had added WAY too much wheat bran. It was supposed to be 1 TBS to replace the oats and I put in 1/4 cup. OOPS!! I think that this won't be so bad since oats puff up so much and wheat bran doesn't nearly so much.
I also added 1/4 tsp baking soda and 1/4 tsp cream of tartar (since the McVitie's use tartaric acid).
I also used 4 half-n-half singles this time.

After the first biscuit I added another TBS each of butter and sugar to make up for the extra bran.
I also turned the heat back down to 350F since I was getting the extra browning around the edges again.


OH WAIT!!
That batch that I thought was a goner - the last biscuit that I got from it was actually REALLY CLOSE!!!
It just needed a bit more sugar and butter! WhooHoo!
So I went back to that dough, added 1 TBS of each and baked another biscuit.
I think baking these a little longer than 15 mins at 350F might also make them crispier - so I tried that too.

Actually, on second thought, I should have only added the butter - but c'est la vie! That's why I wrote down each step of this process.

In the end, I came 90% close to a perfect match with the third batch with all the extra changes. But the second batch with the final changes was pretty good too.

I have now been baking for over 6 hours, but not bad for cracking a mystery code of ingredients for such a sought after delicacy!


Once I had the biscuits I wanted, I baked the rest of them and coated the backs of them with melted semi-sweet chocolate chips. YUMMY! I, my family, and the neighbor kids highly approved!

The finally winning recipe is as follows:

INGREDIENTS:
3/4 cup whole wheat flour
1/4 cup all-purpose flour
1/2 teaspoon baking powder
1/4 baking soda
1/4 cream of tartar
1/4 cup wheat bran
4 tablespoons butter
5 tablespoons brown sugar
1 tablespoons Crisco
1/2 teaspoon vanilla
4 half-n-half singles (little more than 3 TBS half-n-half)

DIRECTIONS:
Preheat oven to 350F.
In a large bowl, mix together the flours, bran, baking powder, baking soda, and cream of tartar with a pastry blender. Mix in sugar with the pastry blender. Mix in fats with the pastry blender. The mix at this point should be crumbly and uniform. Mix the vanilla in the half-n-half and add to the mix. Mix with pastry blender until it is uniform and resembles really soft playdoh.

You can at this point refrigerate for 20 minutes to make the dough easier to handle, but it is not necessary. Be sure to roll out dough between two pieces of waxed paper! Roll to approximately 1/8" thickness. Cut into rounds with cookie cutter about 2 1/2 inches in diameter (I used the ring off one of my canning jars).

Transfer to cookie sheets and prick with a fork. Bake 15 to 18 minutes (adjust the baking time up to dry them out more if the biscuits are too soft and fluffy), or until golden. Let cool on wire rack.

Optional: spread the backs of the cooled biscuits with melted semi-sweet chocolate (as in chips - almost everyone has these for chocolate chip cookies). Set the biscuits chocolate side up on the rack until chocolate hardens.


Store in an airtight tin -if storage is even necessary! They will go fast!

Sunday, March 11, 2007

Pan Pizza

I love Pizza Hut Pan Pizza. I have been trying to replicate the crust for years. It has been slow going even with my awesome baking ability and my ace-in-the-hole - my husband was a Pizza Hut deliverer for four years.

The other day I stumbled upon a combination of ingredients that I think come pretty damn close.

I used a bread machine to make the dough - why not if you have one, right?
  • 3/4 cup warm water
  • 1 TBS olive oil
  • 1 tsp salt
  • 1-1/2 TBS sugar
  • 1-1/2 cup flour
  • 1-1/2 tsp dry yeast

Place the ingredients in the machine in this order (for most machines - check your machine for specifics). Set your machine to "pizza dough", if it has that setting; otherwise "dough", or you could just be sure to take the dough out after the first rise if it is a really basic machine without any extra settings. You will want to push the ingredients from the corners of the pan as the dough mixes to be sure that every thing mixes in.

This is a really loose, sticky dough; but, it could still be made by hand. You will have problems trying to knead this, so I would recommend just mixing it well.

When taking the dough out of the bread pan, carefully remove the mixing blade first without tearing apart the dough - once the dough is torn it is VERY DIFFICULT to get back together. Use a lightly oiled silicon spatula to pull the dough away from the edges of the pan to get at the blade below. Once the blade is removed, reform the dough into a solid mass before putting it into a well oiled pan. I used my cast iron skillet.
Very nice.

Carefully push the dough, without tearing it, to fill the bottom of the pan evenly. Let the dough "proof" (as they say in the pizza biz) for a half hour before putting any toppings on it. I turn on the oven about fifteen minutes into the proofing to be sure that the oven is good and hot before I put in the pizza - 350°F to 375°F.

The sauce goes on first. I usually make my own, but I used a jarred spaghetti sauce for this one, any one you like should do. Then cheese. I like to use a few different kinds of cheese for more intricate flavor. We used Hormel turkey pepperoni, YUM!!!

Bake for 20-30 minutes. The pan gets really hot so be careful taking it out. Use a spatula or knife to run around the edge of the pizza, then slide the pizza onto a cutting board. I used a chefs knife to cut this bad-boy.

Although it is not exactly like Pizza Hut Pan Pizza, it was excellent. Thumbs way up from the family. I made an extra one and brought it to work, where I got all very good reviews including a "I have to tell you, YOU are the absolutely BEST pizza maker I know!!! I am in love with your pizza!!"

Awe shucks!

Tuesday, December 27, 2005

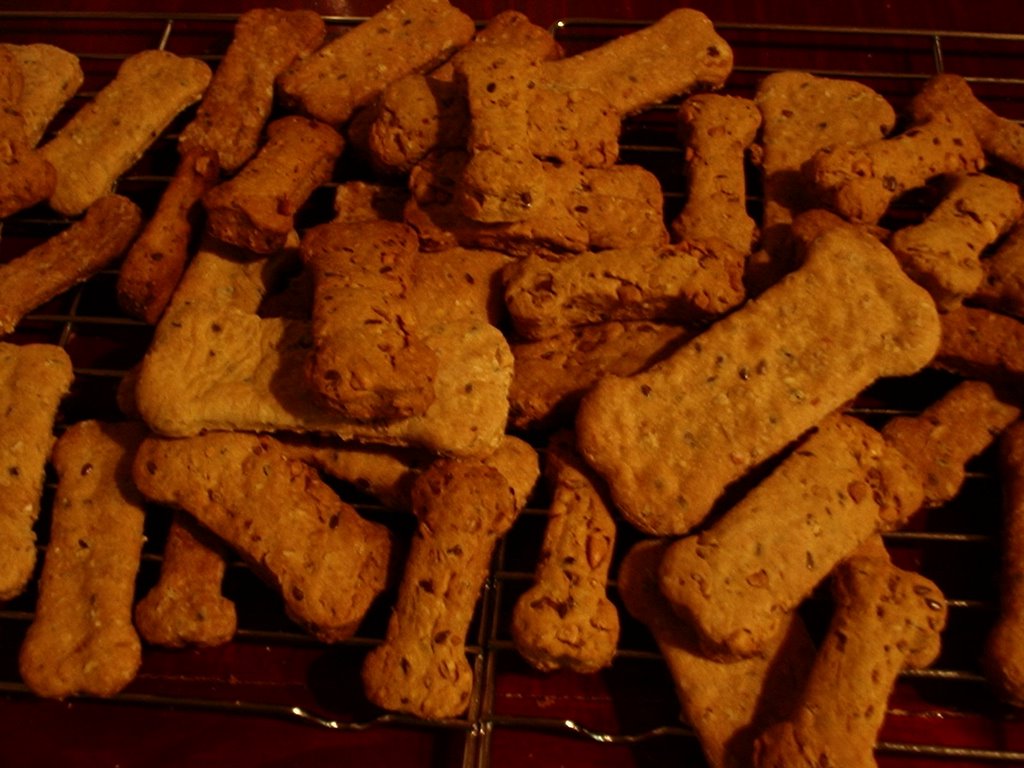
Peanut Butter Dog Biscuits


This is my own recipe. I usually look at a bunch of different recipes trying to decide which one I will make, and in the end I just wing it.

  • 1/4 cup bulghur wheat
  • 2 1/2 cups flour (or more as needed)
  • 2 eggs
  • 1/3-2/3 cup rolled oats
  • 1/8 cup flax seed
  • 1/8 cup vegetable protein
  • 1/8 cup wheat germ
  • 1/2-3/4 cup chunky peanut butter
  • 1 1/2 cups boiling water

Mix all this together. It should resemble bread dough. Add more flour if it is too sticky. Roll out onto floured area and cut the dough into desired sizes and shapes. I had bone shaped cookie cutters, but your dog really isn't going to care what they look like. You could just cut them into strips.

They should be baked in a 325 degree oven for about 40-60 minutes. They will be dry and hard when done. Cool and store in a non-airtight container.

My dogs highly approved!! Four paws!

Thursday, August 25, 2005

Zucchini Pancakes

This is a good recipe for those zucchini that have gotten a little too big to just slice up and throw into a sauce, fry up or grill. I get those all the time. I either forget to check if there are any that need to be harvested, or they hide and I don't see them until they are taking over the yard.
  • 1 monster zucchini, grated
  • 2 cups flour
  • 1/2 cup sugar, brown or white
  • 2 tsp baking powder
  • 1 tsp baking soda
  • 1/2 tsp salt
  • 2 cups buttermilk
  • 2-3 eggs
  • 3-4 TBS oil or melted butter
  • 1/2 cup chopped nuts
  • 1-2 tsp cinnamon
Get one of those monsters, cut the ends off. Slice it in half and then slice the halves long way. Scoop the seeds out. Grate the zucchini.

In a large bowl mix dry ingredients. Add wet ingredients. For the buttermilk, you can either use fresh or reconstituted powdered buttermilk (which is what I use).

Mix in the grated zucchini. The mix should be just thick enough that you could ladle. If it is too thick you can add a little more water or buttermilk. If it is too runny, you can add a little more flour.

Chop some pecans or walnuts and mix in. Sprinkle a couple teaspoons of cinnamon on the batter and mix in.

Heat a griddle or frying pan to medium high. I use a cast iron pan. Pancakes just come out better on cast iron. You will want to make sure that you keep any pan you use oiled. You will probably have to oil between cakes. I just spray with Pam after every other cake.

Ladle the batter onto the griddle/pan. When the edges are dried and it is possible to flip the cake, do it. This is the fun and frustrating part. You can check if the cake is able to be turned by trying to get a spatula under it. If the cake seems too loose to lift in full, leave it a little longer. If your cakes are starting to burn before you can turn them, reduce the heat a little. You will only have to cook the second side about half the time as the first.

Serve these with butter. They are like zucchini bread so syrup probably isn't necessary, but my husband and son like them with maple syrup, so maybe you will too.